Operating-range validation
How much does the board draw at 3.0 V, and does it still run at 2.4 V? The AT1032S answers both in one loop: its programmable supply steps across the board's range while its built-in current measurement records consumption at every step and a heartbeat pin tells you whether the board is still alive. What used to take a programmable PSU, a bench ammeter and a scripted logic monitor is one script and one cable.
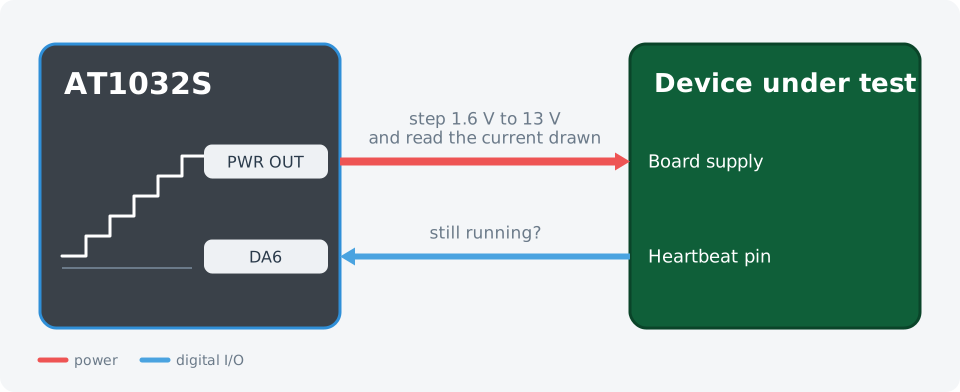
Step the supply, read the current, watch the heartbeat. The brown-out point falls out of the table.
Wiring
| AT1032S | Device under test |
|---|---|
PWR OUT + / − | Board supply input |
DA6 | Heartbeat pin (any pin the firmware toggles) |
The test sequence
- NodeJS
- Python
import { AT1000 } from '@ikalogic/at1000';
import { writeFileSync } from 'node:fs';

// ---- The sweep ------------------------------------------------------------
const V_START = 2.0;           // first step
const V_END = 5.5;             // last step
const V_STEP = 0.25;
const SETTLE_MS = 300;         // let the rail and the board settle
const CURRENT_MAX_A = 0.60;    // abort the sweep above this
const HEARTBEAT_IO = 6;
const HEARTBEAT_WINDOW_MS = 500;
const CSV_PATH = 'operating-range.csv';
// ---------------------------------------------------------------------------

const sleep = (ms) => new Promise((resolve) => setTimeout(resolve, ms));

const devices = await AT1000.findDevices();
const tester = await AT1000.open(devices[0]);
await tester.reset();

const supply = tester.power.dut(0);
const heartbeat = tester.gpio.digital(HEARTBEAT_IO);
await heartbeat.configure_input({ vih: 1.2, vil: 0.6 });

// The board is alive when the heartbeat pin changes state within the window.
async function heartbeatAlive() {
  const first = await heartbeat.read();
  const deadline = Date.now() + HEARTBEAT_WINDOW_MS;
  while (Date.now() < deadline) {
    if ((await heartbeat.read()) !== first) return true;
    await sleep(10);
  }
  return false;
}

const rows = [];
let brownOut = null;

for (let target = V_START; target <= V_END + 1e-9; target += V_STEP) {
  const setpoint = Number(target.toFixed(2));
  await supply.enable(setpoint);
  await sleep(SETTLE_MS);

  const volts = await supply.read_voltage();
  const amps = await supply.read_current();

  if (amps > CURRENT_MAX_A) {
    await supply.disable();
    console.log(`Aborted at ${setpoint} V: ${amps.toFixed(3)} A exceeds the limit.`);
    break;
  }

  const alive = await heartbeatAlive();
  if (!alive) brownOut = setpoint;      // last voltage at which it did not run

  rows.push({ setpoint, volts, amps, alive });
  console.log(
    `${setpoint.toFixed(2)} V set | ${volts.toFixed(3)} V measured | ` +
    `${(amps * 1000).toFixed(0)} mA | ${alive ? 'running' : 'not running'}`);
}

await supply.disable();

writeFileSync(CSV_PATH,
  'setpoint_v,measured_v,current_a,running\n' +
  rows.map((r) =>
    `${r.setpoint},${r.volts.toFixed(3)},${r.amps.toFixed(3)},${r.alive}`
  ).join('\n') + '\n');

console.log(`\nWrote ${rows.length} steps to ${CSV_PATH}`);
if (brownOut !== null) {
  console.log(`Board did not run at or below ${brownOut.toFixed(2)} V.`);
} else {
  console.log('Board ran at every step of the sweep.');
}

await tester.reset();
from ikalogic_at1000 import AT1000
import csv
import time

# ---- The sweep ---------------------------------------------------------------
V_START = 2.0            # first step
V_END = 5.5              # last step
V_STEP = 0.25
SETTLE_S = 0.3           # let the rail and the board settle
CURRENT_MAX_A = 0.60     # abort the sweep above this
HEARTBEAT_IO = 6
HEARTBEAT_WINDOW_S = 0.5
CSV_PATH = "operating-range.csv"
# -------------------------------------------------------------------------------

devices = AT1000.find_devices()
tester = AT1000.open(devices[0])
tester.reset()

supply = tester.power.dut(0)
heartbeat = tester.gpio.digital(HEARTBEAT_IO)
heartbeat.configure_input(vih=1.2, vil=0.6)


def heartbeat_alive():
    """The board is alive when the heartbeat pin changes state within the window."""
    first = heartbeat.read()
    deadline = time.monotonic() + HEARTBEAT_WINDOW_S
    while time.monotonic() < deadline:
        if heartbeat.read() != first:
            return True
        time.sleep(0.01)
    return False


rows = []
brown_out = None

setpoint = V_START
while setpoint <= V_END + 1e-9:
    setpoint = round(setpoint, 2)
    supply.enable(setpoint)
    time.sleep(SETTLE_S)

    volts = supply.read_voltage()
    amps = supply.read_current()

    if amps > CURRENT_MAX_A:
        supply.disable()
        print(f"Aborted at {setpoint} V: {amps:.3f} A exceeds the limit.")
        break

    alive = heartbeat_alive()
    if not alive:
        brown_out = setpoint         # last voltage at which it did not run

    rows.append((setpoint, volts, amps, alive))
    print(f"{setpoint:.2f} V set | {volts:.3f} V measured | "
          f"{amps * 1000:.0f} mA | {'running' if alive else 'not running'}")

    setpoint += V_STEP

supply.disable()

with open(CSV_PATH, "w", newline="") as handle:
    writer = csv.writer(handle)
    writer.writerow(["setpoint_v", "measured_v", "current_a", "running"])
    for setpoint, volts, amps, alive in rows:
        writer.writerow([setpoint, f"{volts:.3f}", f"{amps:.3f}", alive])

print(f"\nWrote {len(rows)} steps to {CSV_PATH}")
if brown_out is not None:
    print(f"Board did not run at or below {brown_out:.2f} V.")
else:
    print("Board ran at every step of the sweep.")

tester.reset()
tester.close()
Adapting it to your board
V_START,V_ENDandV_STEPdefine the sweep. The supply covers 1.6 V to 13 V, and 24 V is available as a fixed setting.CURRENT_MAX_Ais the abort threshold. The sweep stops and the supply is switched off the moment the board draws more than this.- The heartbeat check is whatever proves your firmware is running. A toggling pin is the simplest; a UART banner or a CAN frame works the same way.